kbnykkn skrg pkai sata.....jd klau pkai version os xp yg lama sket mmg xder d bekalkn kt dlm tue...jd windows xleh detect hdd tue...jd kene wt ikut step la klau nk pkai xp....

There is 2 part of the guide :
- Slipsteam the RAID/SATA drivers to the XP Setup and create an updated driver setup disc
- Load the SATA/RAID drivers from floppy (USB Floppy needed for laptops)
Slipsteam the RAID/SATA drivers to the XP Setup and create an updated driver setup disc! I would recommend that if possible use a CD-RW for your work
unless of course you don't mind throwing a CD in case something mess up
!There is an increasing amount of thread on the matter and wish that i
could be of some help and solve it easy way. I dare not put this in the
Guide section so hopefully if its not appropriate here too, Mods please
delete the thread or move it elsewhere. Thanks.
Opening :Even with the existance of Windows Vista, XP nonetheless is still the
choice of OS for a lot of people for now. But because of how old XP is
to date and with the emerging of new technologies, the original drivers
that came with the XP Setup itself is almost obsolete.
To cut the crap short, laptop doesn't have a floppy drive and XP is
unable to load SATA/RAID drivers from another location besides floppy.
Of course, not all laptop BIOSes can enable native SATA to emulate PATA
hence the existance of this guide. So the only ways to install XP on
your ub3r new laptop that runs SATA HDD would be to update the driver
database in XP Setup itself.
Tools needed :
- Windows XP Setup CD
- DriverPack
- CDIMAGE GUI
- CD/DVD Burner to burn CD
How-to :First of all, copy the contents of your CD to a working path, in this case i'll use C:\WINXP
Download DriverPack
BASE from the link above as well as DriverPack
MassStorage. Extract the BASE pack into a new folder and put the MassStorage pack you downloaded into the
DriverPacks folder.
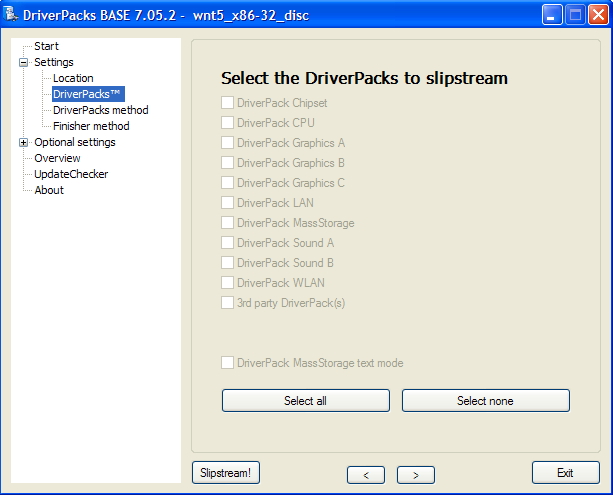
If the setting is grey out like the image below :

The solution :
DO NOT extract the downloaded files into
DriverPacks folder. Leave intact as is (i.e. copy that archive into
DriverPacks folder). The
DPs_BASE will automatically do the extraction. See the image below :

If you do it right, you can have the selection as below :clap: :
 Credits: keyz
Execute DPs_BASE.exe and use the
installation platform selected to
disc. Browse to the XP working directory you copied from the CD just now, in my case C:\WINXP earlier. Select the
DriverPacks list that will appear after loading the working directory and put a
check mark on
DriverPack MassStorage.
Put a tick in the box which says
"DriverPack MassStorage text mode". Leave all the other settings as it is if you don't know what is it for.

After you're done with everything, hit the
SlipStream!button and wait for the process to finish. The process should finish in
around 10 minutes. After the slipstream process is finish, proceed by
downloading CDIMAGE GUI.
Extract and run the application, only change the "Root DIR" to your
working directory in my case C:\WINXP and the "Iso file Path" to where
you want to save the ISO file generated.

Select the boot.img file to load the bootable image into the ISO file.
 Leave all other settings intact
 as it should unless you know what its doing.
After the ISO file is generated, burn it with any burning software to a
CD and proceed with booting the setup. Your SATA hard drive should be
recognised now without the need to press F6 and load drivers.
The DriverPack should contain most SATA/RAID device drivers so it
should work on most computers.


