Custom fiberglass tweeter pod.
This is a write up on how to make your own fiberglass tweeter pod. Before we start, these are the things you’ll need to complete the project:
1. MDF board. Because we are making a tweeter pod, you don’t have to use a thick board. I suggest you to use a ½ inches board. However in this project, I’ll be using a cake board. hehe
2. Fiberglass resin and fiberglass matt. Bought this at an unnamed shop in kolombong (near Hup Seng Heng)
3. Body filler Polly Putty (car body cement)
4. Sand paper 240, 360, 800, 1000,1500 and 2000 grit.
5. Wood glue
6. Hot glue
7. Dremel Tools (or any rotary tools)
8. Geometry set.
9. Some stretchable fabric (I use stretchable bandage)
10. Spray can (if u want to wrap your finished product then you may skip this)
11. Masking tape
12. Old newspapers
13. Face mask (you going to need this for the sanding activity)
14. A lot of cheap hand brush (I recommend using 1/2 inches brush. Cost around 70 cents)
15. Some paper cup.
16. Syringe (I’m using the syringe for printer cartridge refill. The long needle is pretty useful)
17. Rubber gloves.
18. Some disposable bamboo chopsticks.
19. 3m double tape


First of all, all you need to do is, measure your tweeter. After that, use your pencil compass to draw the circle on the board. After that, cut the circle. As in the picture, I’m using dremel circle cutter to cut the board. Make sure to cut the outer circle first because you need the center to guide the dremel. For each tweeter, I stacked up 3 boards to make it thicker. One layer for the base (where the tweeter will be screw on to) and another 2 at the outer circle. After that, I use wood glue to stick the 3 board together. Don’t forget to sand it using 240 grit paper to make a clean finish.

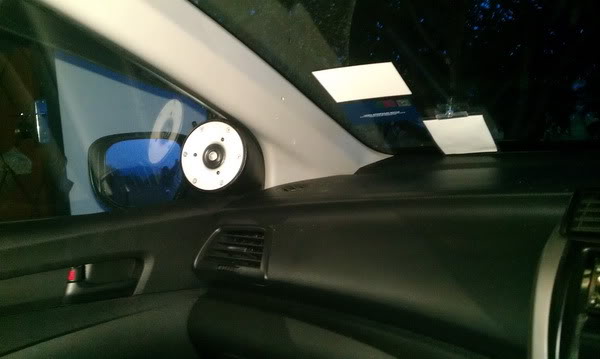
The next step is to start the fabrication. I’m going to place the tweeter on the sail panel without using the stock sail panel. Therefore, I’ll be making a new sail panel for it. First, use the masking tape and stick it on the place where you want the tweeter be placed. Make sure the tape covers every corner. Be patient. Don’t rush. Cut the tape to some small pieces to make it easier for you. Make sure you put at least 3 layers of masking tape to prevent the resin from leaking inside the tape. Place some old newspaper around your fiberglass area to prevent any drops on the car.
Now get ready for some fiberglassing activity. Before you start, make sure you are in an open air environment. Do not fiberglass in the car with all the doors and windows closed. The fume is highly toxic and you’ll get high. Hehe. Don’t forget to wear your rubber gloves because things might get messy. Always wear your glove every time you working with fiberglass.

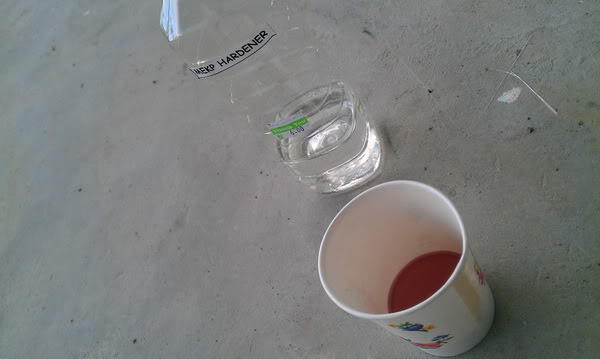
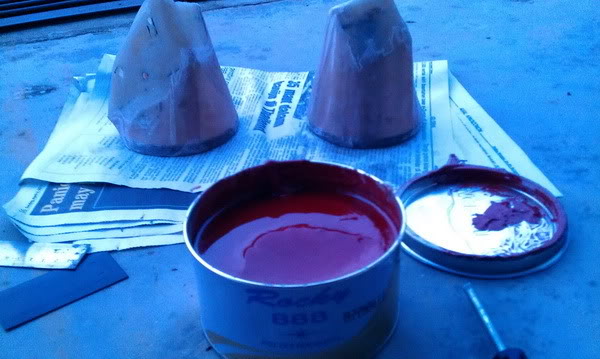
Now pour some fiberglass resin in the paper cup. You only need about 1/6 cup of resin. If u make too much then it’ll be a waste. Put around 5 to 10 drops of the hardener (use the syringe) and stir it by using the chopstick for about 30 seconds. The amount of hardener you need actually depends on the environment temperature. If you put too many then it gets hard before you can finish. Therefore you need to do some experiment on this yourself for the hardening time. However, if you put too much, the resin can gets hot and caught fire! Never try this though =)
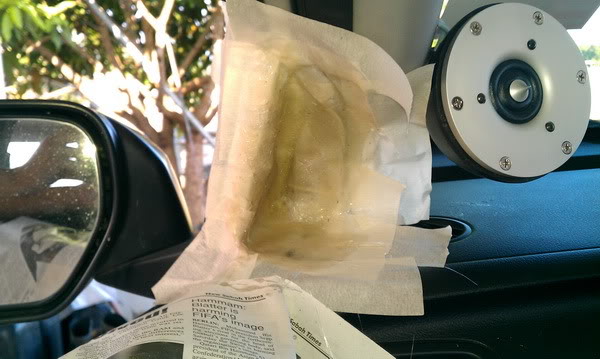


Now take that cheap brush and dip it onto the resin. Now paint it on the masking tape you made earlier. Make sure you didn’t put too many as it can flow outside the tape and might drop on the car. A thin layer should be fine. Don’t rush, be patient. After that, wait until the resin gets hard like glass. After around 30 minutes to 1 hour, it will be hard enough for the next layer. You need at least 3 to 4 layers of resin so that you can take it out safely. Too thin then I’ll break or out of shape. Make sure it is hard enough before taking it out. After taking it out, now you can work outside your car. Next, cut some fiberglass matt into smaller pieces. Now make some resin (about 1/4 cup). Put some resin first before putting on the fiberglass matt (easier like this). You can see that the fiberglass matt will disappear as you put more resin on top of it. Make sure no air pocket trapped between the matt because this can make your fiberglass weak and breaks easily. 1 to 2 layers of this should be fine. I only did 1 layer of fiberglass matt on mine. Fiberglass the inner part only. Do not fiberglass on the outer part as it may not fit well on the door later on.
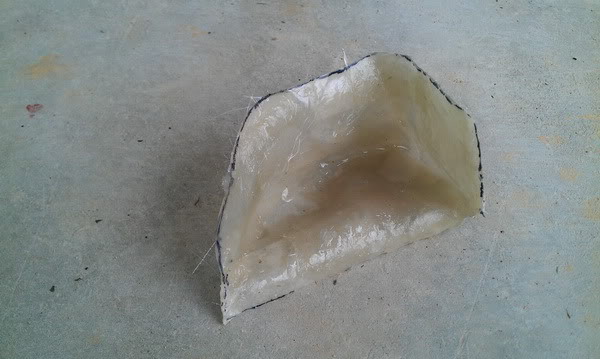

Next, you can cut it to follow the shape you want it to be. Make sure it is same like the other one as it may look weird if it has different shape. For this process, I use the dremel to cut it. Don’t forget to drill holes for the screw to enter and try to put it on the sail panel. If it can’t fit then u need to sand or grind it until it fits. Normally it fits. Don’t worry.
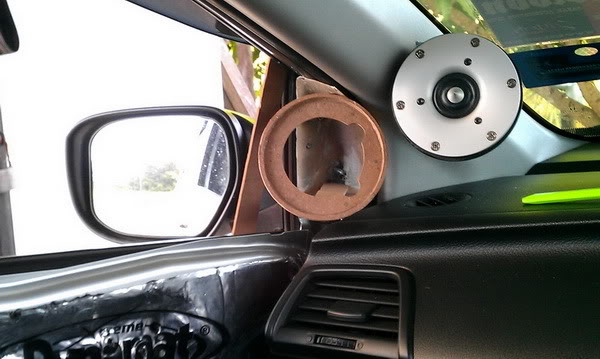

The next step is one of the difficult part of the process. In this process, you need your hot glue, and double tape. I also use the protractor to measure the angle. I make my tweeter angle 75 degree on the left and 80 degree on the right. You can use the bamboo chopstick to hold the tweeter frame but I suggest that you cut some cake board as it is tougher than the chopstick and easier to work with. Use some double tape to hold the frame first and then put some hot glue on it. make sure it is strong because you don’t want it to break later on when you fiberglass on it.

Next, take some stretchable clothes ( I use stretchable bandage) and wrap your tweeter pod.


After that, make some resin (1/3 cup) and start spreading it on the clothes. Do not put too many, because the hot glue might get weak and break.2 layers of resin should be fine. Then, cut the remaining clothes. You need to add some fiberglass matt in the inside especially on the area where the newly fiberglassed and the old one joint together. 1 or 2 layers should be fine. After it cured, try to fit it on the door. Hopefully it will fit well.

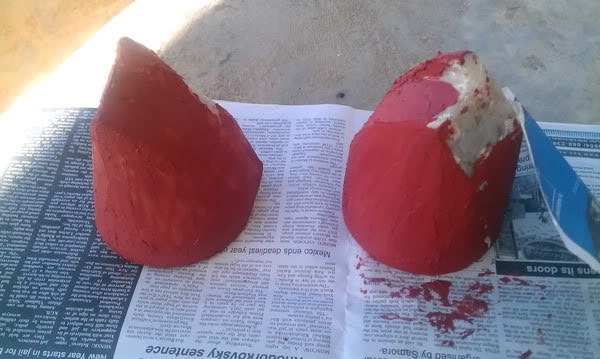

The last hard part of this project is when you need to put the final touch to make it smooth. Because I use bandage, there are uneven areas on the surface. Apart from that, if you don’t put enough resin on the clothes, you will have rough surface. To solve this problem, you need to put some Polly Putty (car body cement). Put some cement on the tweeter pod and use your dremel to make the surface even. After you have even surface, now you need to make it smooth. The enemy on this task is the air bubbles. Put another layer and sand it. Apply the cement on the rough surface only and then sand it again. Repeat the process until you satisfy or give up and plan to wrap it with vinyl or fabric. Don’t forget to wear your face mask during the sanding process.


I didn’t wrap mine with fabric or leather. What I did is, I painted it with flat black. I did 3 layer of mist coat and 1 wet coat.
Doing fabrication needs a lot of patience. I can say it is not very difficult but not too easy also. Next project is fiberglass subwoofer enclosure. Sorry for the poor written article. Thanx for reading


